
| Home About Recipes Gallery Contact |
|
Purple Yam (Ube) Cupcakes with Two Tone Icing
Wednesday, 20 November 2013
"What is that thing?" "Why is it so purple?"

These are the questions I am often asked whenever I post my baked goods using purple yam online. Growing up in the Philippines, purple yam was everywhere and is commonly used in traditional desserts. But only just recently have I realised that this must look strange for anyone who isn't Filipino! I can imagine eating a bright and intensely green-coloured cupcake, per se, and think: "Yup, this is weird!"
This strange purple thing is indeed purple yam, or 'ube' as we Filipinos call it. The best description I can think of is that it is a sweet vegetable of some sort. Often, it is confused for taro or purple sweet potato and is commonly used in Filipino desserts. You can choose to use the actual mushed vegetable or powdered kind or the liquid flavouring in a bottle.
I love using this as an ingredient in my bakes! I have made it before into a chiffon cake, cheesecake and even macarons. Of course, staying true to Chippy Cakes style, I just had to make it into a cupcake form so here is the recipe...
Ingredients
For the purple yam / ube cupcakes:
For the buttercream:
Method:
 BBC Good Food Show London October 2013
Tuesday, 19 November 2013
Hello everyone! Apologies in advance as this will be a very different, lengthy and image-heavy post. But please do read on, as it is all good stuff and I will be entailing my experiences in the BBC Good Food Show last Saturday.
Now, let's get started!
As soon as we stepped foot into the venue and started browsing through the sea of food stalls, this one immediately caught my eye. I knew I recognised it from somewhere but couldn't quite put my finger where, until I saw the bakery name in their banner.
It was Karantania Deli, the very same bakery stall that I visit on Thursday lunch times at work. I've been working in a content marketing agency right in the centre of Covent Garden for almost a year now, and have had the luxury of visiting the regular Thursday food markets. I always go to this stall to look (sometimes buy) and salivate at all the savoury pastry goodness. I was quite disappointed to learn that they aren't participating in the market during the Winter season, so of course, I couldn't pass up on this opportunity and had to buy something!
My friend and I bought the 8-layer cake slice to share and it was goooood! As in finger lickin' goooood! (True story, it was a messy slice). This artisan bakery never disappoints that just before we left, I had to come back and buy a few more of their strudels, which by that point had been reduced to their closing time prices. Bargain!

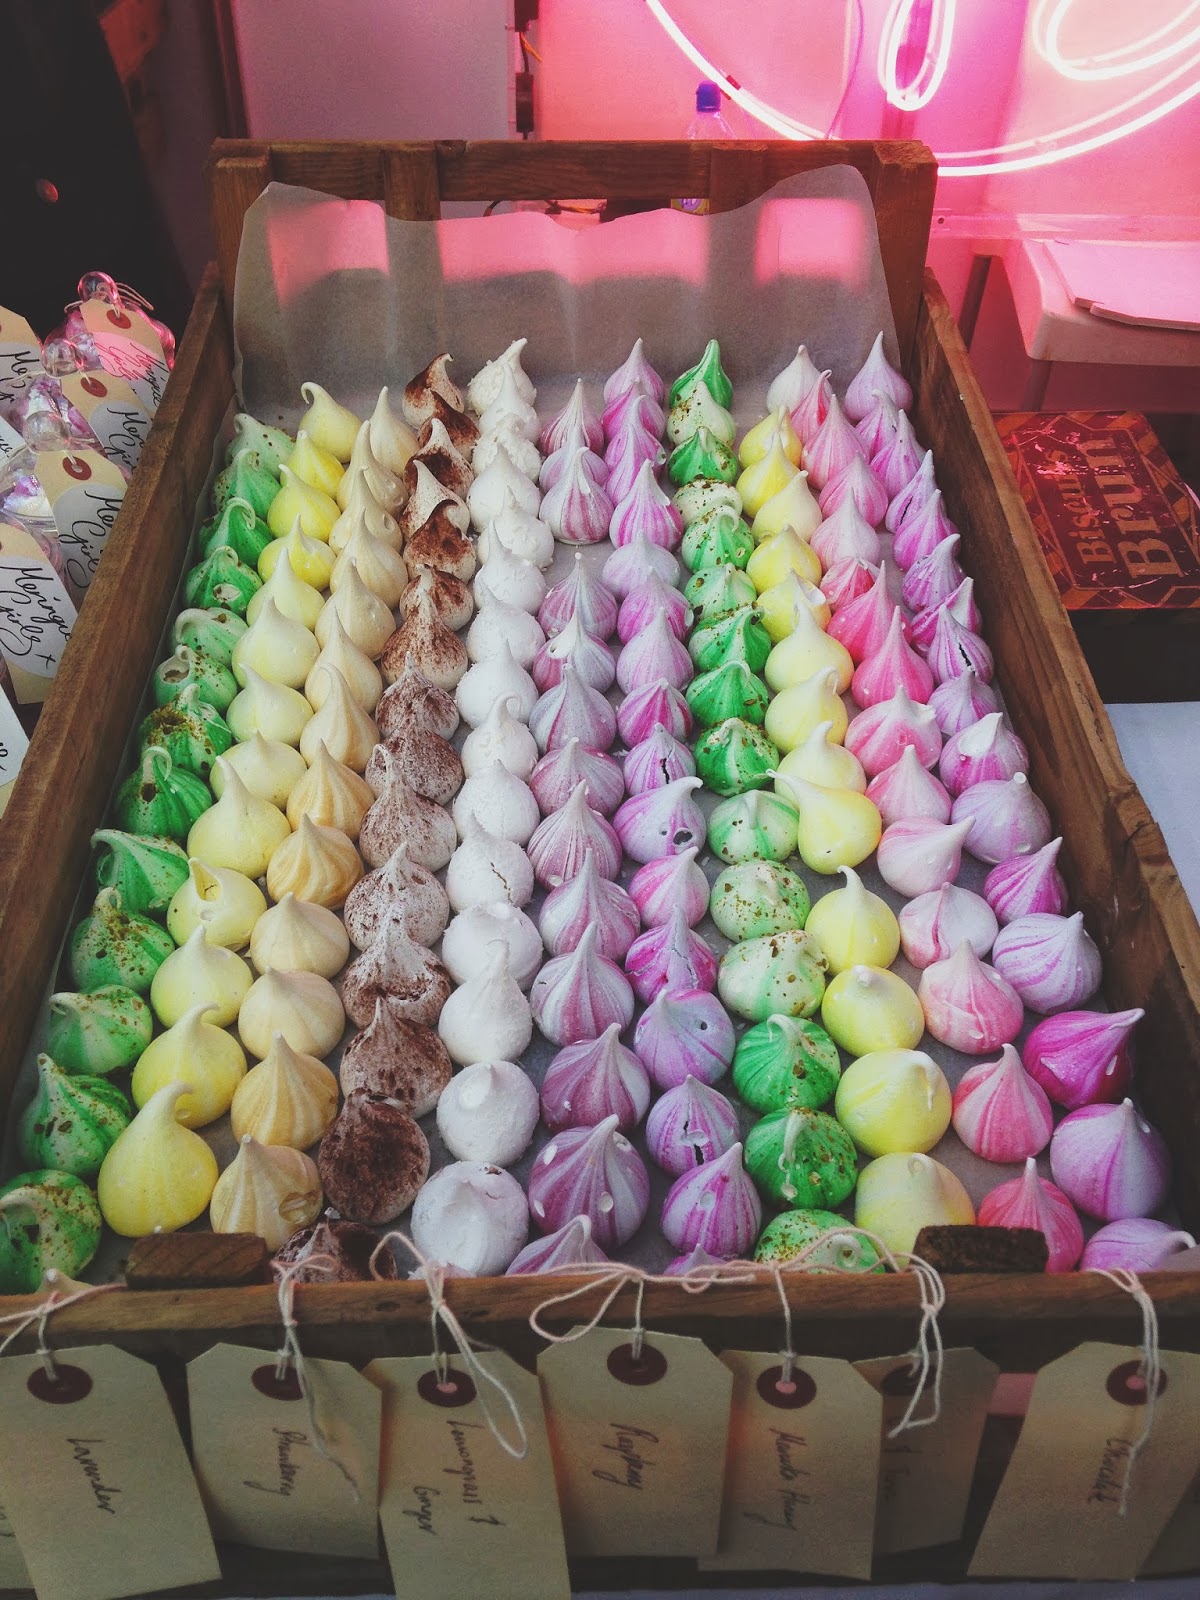
Another favourite stall of mine was the Meringue Girls. Hands down, it was the most visually pleasing of all the stalls in the show - the signature, neon logo; pretty packaging; vintage wooden crates; and of course, the vibrant and colourful meringues. The whole package was an aesthetic success. I just want to buy their book! (I hope my family reads this: *Christmas hint*) I'm sure at some point you had or will have heard of them since their meringue revolution have become more and more popular. And if you haven't checked them out, then I urge you to do so!
One of my highlights for the day was seeing all these celebrity chefs. Now, I'm not one for idolising celebrities. In fact, I try my best to avoid mainstream celebrity culture but in this instance, it was nice to see people who have inspired me in the flesh. Seeing Mary Berry and Paul Hollywood banter live, and watching Larkin Cen (my favourite finalist from Masterchef 2013) cook live was quite a novelty experience. Plus, I got to meet Howard!! Him, Frances and Ali were my favourites in the Great British Bake Off s4. He was such a lovely guy!
  
For an extra £8, I also booked the macarons and wine tasting experience with Le Cordon Bleu. This is quite an embarassing story but amidst booking tickets, I saw 'Le Cordon Bleu', 'tasting experience' and 'macarons' together, panicked and hurriedly booked a space for the event without actually paying attention to the context. I don't know how I have completely overlooked the 'wine' bit, hence, on the day I was surprised to see half of the session spent on tasting and learning about wine. Now, I'm not a big wine person (my lovely readers, please don't judge me!) but I actually enjoyed it! The wine selection was lovely. They were a mixture of sweet and fruity which harmoniously accompanied the mandarin, Christmas pudding and foie gras macarons.
.JPG)
Almost finished... I just want to point out these macarons from the Dimkin's Patisserie stall. One word, they were: intense! I bought a variety across the flavour section: capuccino, salted caramel, passion fruit & chocolate, green apple, and white chocolate & raspberry. The white chocolate and raspberry one was my favourite - the ganache filling mixed with fresh raspberries was beautiful and wasn't too sweet.

And lastly, just two more things worth mentioning before I finish this post. I didn't have the chance to take a picture so this will have to suffice:
Mr. Todiwala - I ate from their pop-up restaurant and also purchased some pickles from their food stall. The Goan King Prawn curry and their Lemon and Chilli pickle are highly recommended! I cannot praise it enough.
Garrett Popcorn - Originally from Chicago, they are branching out to the UK with one of the most delectable popcorns I have ever tasted. They urge to mix both sweet and savoury popcorns in one bite which I tried in their stall, and there was no other way to describe it! It was both weird and nice at the same time - the sweet caramel tone cuts through the cheesy and buttery counterpart. I am eating them right now as I type this...
Labels: Foodspotting Blueberry and Lemon Traybake
Wednesday, 30 October 2013
A month and a half ago, I started the Baking Society in my university. We had an initial 300 sign-ups in two days and presently have 150+ (and growing) official members. Now, while I shudder at the thought of such high responsibility, I also relish at the fact that I founded and currently run such a large community of people who share the same interests: to bake. For our first event: the meet and greet, I brought in a blueberry and lemon traybake. The batch was finished within 10 minutes and I received lots of requests for the recipe. So here it is!  Ingredients: For the sponge:
For the cream cheese frosting:
Method:

The actual sponge itself is very light due to the sour cream and is not sickly sweet in the least bit. In turn, people wanted to eat more of it thinking that it is healthy! For such a simple and easy recipe, the result is absolutely delicious. It is one of my favourite traybake recipes thus far!
Cinnamon Crumb Streusel Topping
Thursday, 12 September 2013
One of my favourite cheats to take my desserts to the next level is a streusel topping! Every bite adds a sweet, cinnamon and buttery crunch to muffins, cakes, pies and breads. It is quick, easy and uses only store-cupboard ingredients - you can even make it in bulk and freeze in advance!
Ingredients:
Method:

Alternatively, you can add desired nuts of your choice to spruce it up even further! I like to use a combination of walnuts and pecans then sprinkle it on top of my favourite banana bread before baking.
Goldilocks-Style Mocha Cake
Wednesday, 11 September 2013
Chiffon cakes are very light and airy foam cakes, similar to angel food cakes. The only difference is that the former contain both egg yolks and a small amount of vegetable oil. These two ingredients contribute to the sponge's distinctive moist and fluffy texture.
Any baking technique which involves whipping up egg whites always intimidate me! I shudder to think about the numerous times that I have wasted and failed at making meringue-based desserts. Yet, somehow on top of making chiffon sponge, I have also decided to make Swiss meringue buttercream!
 Surprisingly, the cake and the buttercream did NOT fail - the gates of heaven must have opened that day! This recipe is fairly simple but I think the most important step that could make or break it is the meringue. It has to be whisked to a tight, firm and glossy stage - meaning no loose or overbeaten meringue! Ingredients: For the mocha cake:
For the Swiss meringue mocha buttercream:
Method:
1. Preheat oven to 375F/190C/Gas Mark 5. Line 2 x 9" round cake pans with parchment paper. 2. Whisk together the egg yolks and sugar in a large bowl over low-medium speed, until creamy and light yellow in colour. 3. Dissolve the coffee granules and cocoa powder in water and vanilla extract in a small bowl. Pour into the egg-sugar mixture along with the vegetable oil, and beat until well combined. 4. Sift cake flour and baking powder over the mixture. Stir until well blended, scraping the sides of the bowl as necessary. 5. Whisk egg whites and cream of tartar into stiff peaks and gently fold into the mocha batter. Divide the batter between the two cake tins and bake for 20-25 minutes. The cake should be done when a skewer inserted in the middle comes out clean. 6. Cool for 10 minutes, then carefully turn over on the wire rack, right side up. Cool completely before icing. 7. To make the buttercream, whisk sugar and egg whites for 3-5 minutes in a bain marie, until meringue is hot to the touch. 8. Remove bowl from heat and beat for 5 minutes. Add the butter in two batches then beat again for a further 6-10 minutes on medium-high speed to thicken the meringue. 9. Dissolve coffee, cocoa, vanilla, water and amaretto (if using) in a small bowl. Pour into the buttercream and beat for 2 more minutes. Make sure that the liquid isn't too hot, otherwise it will melt the buttercream. 10. To assemble, sandwich chiffon in between layers of icing. I chose to sift generous amount of cocoa on top, piped the edges and borders and topped with homemade chocolate swirls. I used ridged edge scraper to create the lined pattern around the sides.  This recipe is perfect for beginners like me who are up for a challenge. It is definitely easier than how it looks, believe it or not! The Swiss meringue buttercream is light, not sickly sweet (unlike ordinary buttercream) and is a perfect accompaniment for the chiffon's soft and pillow-like texture. And because the cake is so light and moist, you won't feel as guilty for having a slice! Mini Filled Doughnuts
Tuesday, 11 June 2013
At last! Here I am again, back in the blogging world! I've been a busy bee and never got round to sit down and type up all of my recipes. There are plenty of baking adventures due to be posted, some successful, some not so much, and some recipes I've had a hard time to recover as they were messily scribbled on kitchen towel.
But for now, I will be sharing this recipe for mini filled doughnuts. They are great for breakfast or even as an afternoon snack. You can use whatever filling that you'd prefer. I used peanut butter and chocolate cream. But I'm sure jam or dulce de leche is just as yummy!
 Ingredients:
Method:
 The dough is much softer and stickier than typical bread dough so be sure to sprinkle as much flour as needed. These were actually not difficult to make, just a little time consuming. But trust me, all of the effort will be worth it!  |
Profile
 ��
��Hii!!! I'm Anna. A 21 year old Media student in London with a baking obsession. I like to make cakes, desserts or any kinds of sweet things and blog about them! Links


Subscribe


|


